#diagonal deck layout
Explore tagged Tumblr posts
Visit Tumblr Blog
Explore Tumblr blogs with no restrictions, modern design and the best experience.
Last Seen Tumblr Blogs


Fun Fact
Hackers stole 65M passwords from Tumblr in 2013.
Text
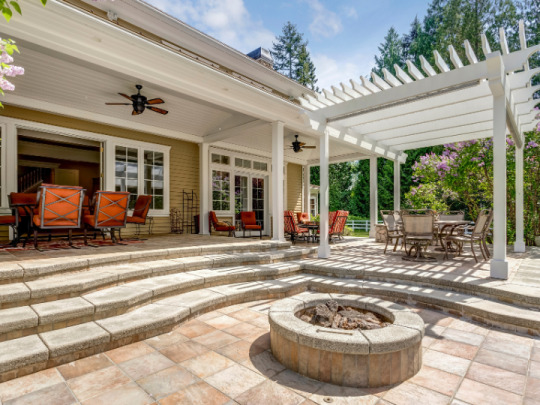
Transitional Deck

Large transitional backyard deck photo with no cover
#large plank wood#medium wood railing#medium wood patio#transitional desk design#deck around tree#outdoor entertaining#diagonal deck layout
0 notes
Text
The intense minutes before a stealthy mission
So yeah, I am funding a new game.

Before the Storm is a solo journaling RPG about the electric stillness before a high-stakes operation—a heist, an assassination, a stealth infiltration. You are already in position: perched in the shadows, breath held, waiting for the moment to strike. The job is minutes away, but your mind is racing, your senses heightened. This is the calm before everything changes.
Using a standard deck of playing cards, you’ll draw prompts that describe what you feel, hear, see and think. Perched in the shadows, you reflect, observe, and brace for impact—while building a puzzle-like poker hand that reveals your state of mind in the final breath before action.

You can play it standalone as a complete solo experience, with prompts that help you envision your character, their mission, and a setting that can range from medieval to cyberpunk. Or slot it into an ongoing campaign to zoom in on a moment of quiet tension before a mission.
Each card gives you a moment: something you sense, remember, question, or notice in the shadows while waiting for the right moment to act. A leading question guides your reflection: about your state of mind, your past, your doubts, or your instincts.
But that’s just half of it.

Alongside the narrative, you’ll be playing a custom variation of poker solitaire. As you draw each card, you place it onto the table, building a grid. Your goal is to form the strongest possible poker hand in a straight line—horizontal, vertical, or diagonal.

Each new card must be placed adjacent to the last. Your entire layout must fit within an imaginary 5x5 grid. If you place a card outside that space, the grid shifts—and you’ll lose any cards left behind. The rules are quite simple (less than three pages), but the strategic tension builds fast (I have to say, this card mechanic works surprisingly well as its own solo puzzle game).

When you finally complete a line of five cards, the game ends. That line becomes your poker hand, and its strength determines your emotional and mental state in the final moment before action.
From there, you can leave the scene as a cliffhanger. Or jump into your system of choice to play out the mission itself. If you’re using Before the Storm as a plug-and-play, your final hand can offer narrative momentum—or even mechanical advantages and complications, depending on the system you’re using.

So if this feels like your jam, check out the campaign and help me spread the word!
73 notes
·
View notes
Text
Time for a few more things:
Neon Ascending: This one was probably doomed from the start because I don't think I've ever really enjoyed playing a tower defense game other than Plants vs Zombies (although Defender's Quest came close). I tried it anyway because it looked like it was doing something interesting, and it was. I can appreciate the roguelite upgrade progression and the way it's more of an inventory management puzzle than anything, but I still don't really feel like playing anymore after a couple runs. Also the skill tree is plagued with many, many extremely boring minor stat upgrades compared to the small number of more interesting ones, but it was only added in the most recent patch, so maybe they'll keep working on it over time.
Picayune Dreams: This one also only lasted a couple runs, but I'm undecided on whether it's doing anything interesting or not. I don't love that everything feels like it has a little too much health and the character moves a little too slowly to be satisfying, but at least it feels a lot better than Deep Rock Galactic: Survivor or Survivors of the Dawn. The bullet heck boss fight patterns are more fun than a lot of stuff in a lot of similar games though. No real opinion on the story or characters because I only made it through the first memory/story/whatever section. Seemed potentially maybe interesting and maybe not, but what stood out more in that section was that diagonal movement being faster than horizontal/vertical movement (because horizontal/vertical speed are fixed) felt very bad. Also more than probably any other game I've played on the Steam Deck, do not ignore the small text warning. It's an absolute nightmare trying to read what the upgrades do, especially during a run but also in the menu afterward (although the latter is more of a layout problem).
Vampire Survivors: Emerald Diorama: Hooray, finally something I actually got along with pretty well. I wasn't going to bother because I really did not get along with Ode to Castlevania at all, but I figured I might as well try it because I've been playing SaGa Emerald Beyond. They actually managed to capture a lot of elements of it surprisingly well, from the structure of the map with different "worlds" to glimmering new attacks to each character having two different possible starting weapons. I generally had a pretty decent time going through it and unlocking everything. Afterward I went back to give Ode to Castlevania another chance. It went a little better than before, but I still have so many complaints about it and would say it's easily still my least favorite thing in Vampire Survivors. A large amount of that could be fixed by giving it its own adventure mode version to introduce stuff in a more controlled and structured way, and the rest has already been solved by other games in the genre or even other parts of VS itself, but I don't feel like complaining about it all over again right this minute unless one of the zero people who reads this is super interested.
3 notes
·
View notes
Text
What Makes a Patio Look Bigger?
Your patio is more than just an outdoor space—it’s an extension of your home. Whether you use it for relaxing, entertaining, or dining under the stars, you want it to feel open and inviting. But if your patio feels cramped or cluttered, it can be hard to enjoy it fully. The good news? With a few design tricks, you can create the illusion of a larger patio without expanding its size. From strategic furniture placement to the right patio enclosures, here’s how to make your patio look bigger and more spacious.
Maximize Space with Patio Enclosures
Adding patio enclosures can enhance the feeling of openness while protecting from the elements. A well-designed enclosure creates a seamless connection between indoor and outdoor living, making your patio feel like an extension of your home rather than a confined space.
Opt for glass or screen enclosures – Transparent materials allow for unobstructed views and let in plenty of natural light, preventing the space from feeling boxed in.
Choose retractable enclosures – These allow you to open up the space when desired, providing an airy and adaptable design.
Incorporate seamless transitions – Sliding doors or large folding panels can blend your patio with the surrounding landscape, making it appear larger.
Use Light Colors and Reflective Surfaces
Color plays a big role in how we perceive space. Lighter shades make an area feel more open, while darker colors can make it appear smaller.
Use neutral or pastel tones on walls, floors, and furniture to create an airy feel.
Use reflective materials like glass tabletops or polished stone to bounce light around the space, creating the illusion of openness.
Stick to a simple color palette to avoid visual clutter, which can make the area feel more confined.
Optimize Furniture Placement and Scale
Choosing the right furniture can make or break the perception of space on your patio. Oversized, bulky pieces can overwhelm a smaller area, while thoughtfully placed, compact furniture can enhance the openness.
Choose multi-functional furniture – Benches with storage, foldable chairs, or nesting tables maximize utility without cluttering the space.
Arrange seating to encourage flow – Avoid blocking pathways or placing furniture too close together. Opt for open, breathable layouts.
Use low-profile pieces – Furniture with slender legs and an open design creates a sense of lightness, making the space more expansive.
Extend the Space with Strategic Flooring
The type and design of your flooring can impact how the patio is perceived. Certain patterns and materials create an illusion of depth and spaciousness.
Use diagonal or horizontal patterns to elongate the visual field and make the patio appear wider.
Opt for continuous flooring that matches or complements your indoor space, creating a seamless transition.
Consider decking with long planks to draw the eye outward and expand the sense of space.
Incorporate Vertical Elements
While floor space may be limited, you can draw attention upward to make your patio feel more open.
Add vertical planters or trellises to create height without sacrificing space.
Use hanging lights or string lights to keep sightlines clear while adding ambiance.
Install tall, slim patio enclosures to frame the area without making it feel enclosed.
Keep the Decor Minimal and Cohesive
When a patio feels bigger, less is often more, less is often more morbid excessive decoration, and focus on a few well-placed pieces that enhance the overall design.
Limit the number of accessories to avoid visual clutter.
Stick to a unified theme to create a cohesive and streamlined look.
Use transparent or lightweight materials like acrylic chairs or open-weave rugs to maintain an airy feel.
Utilize Smart Landscaping Techniques
Your patio is not isolated—it’s part of the larger outdoor environment. How you design the surrounding landscape can influence how spacious your patio feels.
Use greenery to frame, not enclose – Tall plants along the edges can create depth without making the space feel boxed in.
Create sightlines to extend the view – Position seating to face open areas rather than walls or fences.
Incorporate mirrors – Outdoor mirrors can reflect light and space, adding depth to the patio.
Conclusion
A small patio doesn’t have to feel cramped. Smart design choices—incorporating patio enclosures, using light colors, and selecting the right furniture—can transform your outdoor space into a stylish, open retreat.
Looking to enhance your patio with high-quality enclosures and screens? Visit Screenmobile of Michiana Shores, MI, to explore custom patio enclosure solutions that fit your space and style. Don’t let limited space hold you back—create the outdoor oasis you’ve always wanted!
2 notes
·
View notes
Text
Design a Room with Flooring
Design a Room with Flooring: A Comprehensive Guide to Elevating Your Space

1. Types of Flooring Materials
Hardwood Flooring: Classic, durable, and timeless, hardwood floors are available in various species like oak, maple, cherry, and walnut.
Laminate Flooring: Cost-effective and easy to install, laminate mimics hardwood, stone, or tile. It’s perfect for high-traffic areas.
Engineered Wood Flooring: Combines real wood veneer with plywood layers, offering the look of hardwood at a lower cost.
Luxury Vinyl Plank (LVP): It is perfect for bathrooms and kitchens because it is waterproof, Design a Room with Flooring resilient, and comes in genuine wood and stone patterns.
Tile Flooring: Ceramic and porcelain tiles are durable and waterproof, great for bathrooms, kitchens, and entryways.
Stone Flooring: Although they require more upkeep, natural stone such as marble, granite, slate, or travertine gives any space an opulent sense.
Carpet Flooring: Soft, warm, and comfortable, carpet works well in bedrooms and living rooms.
Cork Flooring: Eco-friendly and soft underfoot, cork is a sustainable option for those who prioritize comfort and the environment.
Bamboo Flooring: Another sustainable choice, bamboo offers a modern, sleek appearance similar to hardwood.
Concrete Flooring: Modern, industrial, and low-maintenance, concrete can be polished, stained, or left raw for a chic, Design a Room with Flooring minimalist look.
2. Room-Specific Flooring Considerations
Living Room Flooring: Prioritize aesthetics and comfort with options like hardwood, carpet, or laminate. Large area rugs can add warmth to hard surfaces.
Bedroom Flooring: Comfort is key. Carpet or engineered hardwood paired with rugs can provide a cozy, inviting atmosphere.
Kitchen Flooring: Durability and water resistance are crucial. Tile, LVP, or engineered wood are excellent choices for kitchens due to their resistance to spills.
Bathroom Flooring: Moisture is a concern, so tile, stone, or LVP flooring are preferred for their waterproof qualities.
Home Office Flooring: Focus on creating a quiet, comfortable space. Laminate or carpet reduces noise, Design a Room with Flooring while hardwood adds sophistication.
Entryway Flooring: This high-traffic area requires durable, easy-to-clean materials like tile, stone, or LVP.
Basement Flooring: Given the moisture in basements, waterproof options like LVP, tile, or sealed concrete are best.
Outdoor Patio Flooring: Opt for durable materials that can withstand weather, such as stone, tile, Design a Room with Flooring or treated wood decking.
3. Flooring Design Elements
Color and Finish: Dark flooring provides richness and comfort, while light-colored flooring elongates and opens up compact spaces. High-gloss, semi-gloss, or matte finishes can transform a space from casual to sophisticated.
Pattern and Layout: Layouts that use checkerboard, diagonal, or herringbone can improve the design. Tile size, Design a Room with Flooring grout color, and plank width all affect the final appearance.
Texture: Smooth, polished floors create a sleek look, while hand-scraped or distressed textures offer a rustic or vintage vibe.
Underlayment: Selecting the appropriate underlayment enhances noise reduction, insulation, and comfort. It’s particularly crucial for hardwood and laminate floors.
Eco-Friendly Flooring Options: Sustainable materials like bamboo, cork, reclaimed wood, and linoleum are eco-conscious choices for green design.
Heated Flooring: Radiant floor heating adds luxury and comfort, especially in bathrooms and colder climates.
4. Installation Techniques
Floating Installation: Planks of laminate and engineered wood frequently click together using a floating technique that eliminates the need for glue or nails, Design a Room with Flooring simplifying do-it-yourself installation.
Glue-Down Installation: Used with vinyl, carpet tiles, and engineered wood, glue-down methods provide stability and durability.
Nail/Staple Installation: This traditional method is common for hardwood flooring and provides a secure, permanent solution.
Tile Installation: requires grout lines to be carefully planned and spaced. Tiles can be laid in a variety of patterns, including unique designs, Design a Room with Flooring diagonal patterns, and straight patterns.
5. Maintenance and Care
Cleaning Hardwood Floors: Use soft-bristle brooms, vacuum without a beater bar, and damp mop with hardwood-safe cleaners.
Tile and Stone Maintenance: Regular sweeping and mopping with appropriate cleaners prevent dirt buildup. Stone floors may require periodic sealing.
Caring for Carpet: Vacuum frequently to reduce dust and dirt accumulation, and have carpets professionally cleaned periodically.
Vinyl and Laminate Cleaning: These surfaces are easy to clean with regular sweeping and damp mopping. Avoid excessive water on laminate.
Preventing Scratches: Use furniture pads, rugs, and mats to protect floors from scratches, especially in high-traffic areas.
6. Budget Considerations
Material Costs: The cost of flooring materials varies greatly. In general, Design a Room with Flooring vinyl and laminate are less expensive than hardwood and genuine stone.
Installation Costs: Professional installation costs depend on the complexity of the job and the type of flooring. DIY options like floating floors reduce costs.
Long-Term Value: High-quality materials like hardwood or stone may cost more upfront but add significant value to your home over time.
7. Trends in Flooring Design
Wide Plank Hardwood: Wider planks offer a modern, spacious look that has gained popularity in recent years.
Luxury Vinyl Tile (LVT): Mimicking high-end materials at a lower cost, LVT continues to grow in popularity for both its aesthetic appeal and practicality.
Sustainable Flooring: Eco-friendly materials like bamboo, cork, and reclaimed wood are increasingly preferred for their environmental benefits.
Neutral and Natural Tones: Earthy, neutral colors, such as beige, gray, and taupe, Design a Room with Flooring are trending as they create a calming, minimalist atmosphere.
Patterned Tiles: Bold, graphic tiles are making a statement in bathrooms, kitchens, and entryways, adding personality to otherwise simple spaces.
Vintage and Distressed Finishes: Flooring with a weathered, vintage look is on-trend, adding character and warmth to modern and rustic interiors alike.
8. Final Thoughts on Designing with Flooring
Flooring is a crucial component of design that may improve the entire house, not simply a room’s functionality. Your choice of flooring will determine the personality and practicality of your room, whether you’re going for a warm, rustic vibe, Design a Room with Flooring a modern minimalist style, or something else entirely.
You may produce a unified, lovely design that satisfies your needs by taking into account elements like material, space function, budget, and style. Every area in your house can have the ideal flooring choice, whether it’s the coziness of hardwood, the toughness of tile, or the environmental friendliness of cork.
Keywords Summary:
Flooring options include hardwood, Design a Room with Flooring laminate, engineered wood, luxury vinyl plank (LVP), tile, stone, carpet, cork, bamboo, concrete, for a particular room, living room, kitchen, and bathroom. Eco-friendly, heated floors, floor cleaning, glue-down, floating installation, and maintenance Wide planks, patterned tiles, vintage finishes, sustainable flooring, trends, and affordability.
Article Source :- https://medium.com/@morefloor12/design-a-room-with-flooring-de12a5cabc6a
0 notes
Text
Wood Decking: The Complete Guide

Wood decking has been a quintessential feature of outdoor living spaces for centuries, providing a natural, warm aesthetic that enhances any backyard or outdoor area. From classic redwood to exotic hardwoods, the options for wood decking are as diverse as the landscapes they adorn. In this comprehensive guide, we delve into everything you need to know about wood decking, from choosing the right type of wood to maintenance tips and design considerations.
Types of Wood for Decking
Cedar: Known for its natural resistance to decay and insects, cedar is a popular choice for decking. It boasts a rich color palette and aromatic scent, making it an attractive option for those seeking a rustic charm.
Redwood: With its distinct reddish-brown hue and durability, redwood is prized for its natural beauty and longevity. It's resistant to decay and warping, making it well-suited for outdoor use.
Pressure-Treated Lumber: Treated with chemicals to enhance durability and resistance to decay, pressure-treated lumber is a cost-effective option for decking. It's available in various grades and can be stained or painted to match your desired aesthetic.
Tropical Hardwoods: Exotic hardwoods such as ipe, cumaru, and tigerwood offer unparalleled strength and durability. While they come at a higher price point, their exceptional resistance to rot, insects, and weathering make them a popular choice for premium decking projects.

Choosing the Right Wood
Consider Durability: Assess the durability and resistance of different wood species to factors such as rot, insects, and moisture. Opt for woods with natural resistance or those treated to enhance longevity.
Aesthetic Appeal: Choose a wood species that complements your outdoor space and aligns with your design preferences. Consider factors such as color, grain pattern, and texture when making your selection.
Maintenance Requirements: Evaluate the maintenance needs of different wood types, including staining, sealing, and periodic inspections. Select a wood decking material that fits your lifestyle and maintenance preferences.
Deck Construction and Design
Deck Layout: Plan the layout and dimensions of your deck to maximize space utilization and functionality. Consider factors such as traffic flow, seating areas, and outdoor amenities when designing your deck.
Structural Support: Ensure proper structural support for your deck by using pressure-treated lumber or steel framing. Follow local building codes and regulations to ensure safety and compliance.
Decking Patterns: Explore different decking patterns such as traditional straight boards, diagonal layouts, or herringbone designs to add visual interest and character to your deck.
Railings and Accessories: Enhance the safety and aesthetics of your deck with stylish railings, lighting fixtures, and accessories. Choose materials that complement your decking material and overall design scheme.
Deck Maintenance Tips
Regular Cleaning: Keep your wood deck clean by sweeping away debris and dirt regularly. Use a mild detergent and water to scrub away stains and mold growth as needed.
Sealing and Staining: Apply a protective sealant or stain to your wood deck every 1-3 years to enhance durability and weather resistance. Choose products specifically formulated for outdoor use and follow manufacturer instructions for best results.
Inspections and Repairs: Conduct routine inspections of your deck for signs of damage, including rot, decay, and loose boards. Promptly repair any issues to prevent further damage and maintain structural integrity.
Seasonal Care: Take seasonal precautions to protect your wood deck from harsh weather conditions such as snow, ice, and UV exposure. Consider covering or storing outdoor furniture during inclement weather to prevent damage to the deck surface.
youtube
Frequently Asked Questions
How do I choose the right type of wood for my deck?
Consider factors such as durability, aesthetics, and maintenance requirements when selecting smooth double wood decking. Opt for wood species with natural resistance to decay and insects, such as cedar or redwood, for longevity. Additionally, assess your willingness to invest time and effort into maintenance tasks like sealing and staining.
What is the difference between pressure-treated lumber and untreated wood for decking?
Pressure-treated lumber undergoes a chemical treatment process to enhance its durability and resistance to decay, insects, and moisture. Untreated wood, on the other hand, lacks this protective treatment and may be more susceptible to rot and insect damage over time.
How often should I maintain my wood deck?
Regular maintenance is essential to prolonging the lifespan and appearance of your wood deck. Conducting routine inspections for signs of damage and addressing issues promptly can also help prevent costly repairs down the line.
Can I install a wood deck myself, or do I need to hire a professional?
The decision to install a wood deck yourself or hire a professional depends on your level of experience, available time, and comfort with construction tasks. Hiring a professional contractor ensures proper installation, adherence to regulations, and peace of mind.
How can I make my wood deck more environmentally friendly?
To make your wood deck more environmentally friendly, choose sustainably sourced wood materials certified by organizations such as the Forest Stewardship Council (FSC). Proper disposal of old or damaged wood decking through recycling or waste management practices also minimizes environmental impact.
Conclusion
Wood decking offers timeless beauty, durability, and versatility, making it a popular choice for home outdoor living spaces of all styles and sizes. By selecting the right type of wood, following proper installation and maintenance practices, and considering environmental considerations, you can enjoy a beautiful and functional wood deck for years to come. Whether you're relaxing with family and friends or hosting outdoor gatherings, a well-designed wood deck is sure to enhance your outdoor living experience.
0 notes
Text
Outdoor Tile Patterns and Layouts: Design Ideas for Creating Dynamic and Eye-Catching Surfaces
Outdoor spaces serve as extensions of our homes, offering opportunities for relaxation, entertainment, and connection with nature. The choice of tile patterns and layouts plays a crucial role in enhancing outdoor surfaces' visual appeal and functionality, transforming them into dynamic and eye-catching features. Explore various design ideas to elevate your outdoor spaces with captivating tile patterns and layouts.
Herringbone: Timeless Elegance
The herringbone pattern is a classic choice for outdoor tile surfaces, renowned for its timeless elegance and visual interest. Characterized by interlocking rectangular tiles arranged at 45-degree angles, the herringbone pattern adds depth and dimension to patios, walkways, and pool decks. Whether using natural stone, porcelain, or wood-look tiles, the herringbone layout creates a sophisticated yet inviting ambience that complements various architectural styles and outdoor settings.
Basketweave: Rustic Charm
Embrace rustic charm and artisanal craftsmanship with the basketweave tile pattern, which features alternating pairs of rectangular and square tiles arranged in a woven pattern. Ideal for pathways, garden borders, and outdoor kitchens, the basketweave layout adds a touch of Old-World charm and character to outdoor surfaces. Enhance the rustic appeal with textured stone or terracotta tiles, creating a warm and welcoming atmosphere that invites relaxation and outdoor gatherings.
Versailles: French-Inspired Sophistication
Channel the elegance and grandeur of French chateaux with the Versailles tile pattern, characterized by a combination of large square and rectangular tiles arranged in a symmetrical layout. This intricate pattern evokes a sense of luxury and sophistication, making it ideal for expansive outdoor patios, courtyards, and formal gardens. Choose natural stone or travertine tiles with rich textures and earthy tones to capture the timeless beauty of European architecture and landscape design.
Windmill: Whimsical Movement
Inject whimsy and movement into outdoor spaces with the windmill tile pattern inspired by the rotating blades of a windmill. This dynamic layout features rectangular tiles arranged diagonally around a central square tile, creating a captivating visual effect that adds energy and rhythm to patios, decks, and pool surrounds. Opt for vibrant mosaic or colourful cement tiles to infuse outdoor surfaces with playful charm and personality, transforming them into focal points that spark conversation and delight.
Random Mosaic: Artistic Expression
Embrace artistic expression and creative freedom with the random mosaic tile pattern, where tiles of varying shapes, sizes, and colours are arranged in an organic and eclectic layout. This eclectic approach allows homeowners to unleash their creativity and personalize outdoor surfaces with unique materials, textures, and hue combinations. From pebble mosaics to glass tesserae, the random mosaic pattern offers endless possibilities for crafting one-of-a-kind outdoor spaces that reflect individual style and imagination.
Outdoor tiles patterns and layouts serve as design elements that elevate the aesthetic appeal and functionality of outdoor living spaces. Whether opting for the timeless elegance of herringbone, the rustic charm of basketweave, or the whimsical movement of the windmill, each pattern offers opportunities for creativity and self-expression, transforming outdoor surfaces into dynamic and eye-catching features that enrich the outdoor living experience.
0 notes
Text
Decking Design Tips for Home Improvements That Wow
When it comes to home improvements, one area that is often overlooked but can make a significant impact is the design of your outdoor space. Creating a visually appealing deck not only enhances the beauty of your home but also provides a space for relaxation and entertainment. In this blog post, we will explore the different aspects of decking Adelaide design, from choosing the right materials to incorporating colours and finishes, as well as exploring patterns, layouts, accessories, and maintenance tips.
So, let's dive in and discover how you can transform your outdoor space into a stunning deck that will be the envy of your neighbours.
Choosing the Right Decking Material
The first step in designing your dream deck is selecting the right material. There are several options for decking home improvements Adelaide available, each with its own set of pros and cons. The most common materials include wood, composite, and PVC.
Wood is a classic choice, known for its natural beauty and warmth. It can be stained or painted to match your aesthetic preferences. However, wood requires regular maintenance, including sealing and staining, to protect it from the elements and prevent rotting or warping.
Composite decking is made from a combination of wood fibres and recycled plastic. It offers the look of wood without the high maintenance requirements. Composite decking is resistant to rot, mould, and insects, making it a durable and long-lasting option. It is available in a variety of colours and finishes to suit any design style.
PVC decking is made from 100% synthetic materials, offering exceptional durability and low maintenance. It is resistant to moisture, mould, and fading, making it an ideal choice for areas with harsh weather conditions. PVC decking is available in a range of colours and finishes, allowing you to create a customised look for your deck.
When choosing the right material for your decking Adelaide, consider your budget, durability requirements, and maintenance preferences. Wood may be more affordable initially, but it requires more upkeep over time. Composite and PVC decking may have a higher upfront cost but offer long-term savings in terms of maintenance.
Understanding Decking Patterns and Layouts
Once you have selected the right material for your deck, it's time to consider the layout and pattern. Decking patterns can create visual interest and enhance the overall design of your outdoor space. Some popular patterns include horizontal, diagonal, herringbone, and picture frame.
Horizontal decking is the most common pattern, with boards running parallel to the house. This pattern creates a clean and classic look, perfect for traditional or modern designs.
Diagonal decking adds a dynamic element to your deck by angling the boards. This pattern creates visual interest and can make a small deck appear larger.
Herringbone decking is a more intricate pattern that involves alternating the direction of the boards at a 45-degree angle. This pattern adds a touch of elegance and works well with larger decks.
Picture frame decking involves creating a border around the deck with a different coloured or patterned board. This pattern adds a finished look to your deck and allows for creative customisation.
When choosing a pattern for your decking Adelaide, consider the size and shape of your outdoor space, as well as your personal style preferences. A larger deck may benefit from a herringbone pattern, while a smaller deck can appear more spacious with a diagonal layout.
Incorporating Colours and Finishes into Your Deck Design
Colour choices can significantly impact the overall look and feel of your deck. When selecting colours, consider your home's exterior and landscape. Choose colours that complement the existing colour palette and architectural style.
For a classic and timeless look, natural wood tones are a popular choice. These warm hues blend seamlessly with the outdoors and create a cosy and inviting atmosphere.
If you prefer a more contemporary or bold look, consider using darker colours or contrasting tones. Black, grey, or even vibrant colours can make a statement and add a modern touch to your deck.
In addition to colour, you also have the option to finish your deck with either stain, paint, or a natural finish. Stains enhance the natural beauty of the wood, protect it from UV damage, and provide a rich colour that lasts. Paint offers a more customisable option, allowing you to match your deck to your home's exterior or create a unique look. Natural finishes, such as oils or sealers, provide a protective barrier while maintaining the natural appearance of the wood.
When choosing a finish, consider the level of maintenance you are willing to commit to. Stains and paints may require periodic reapplication, while natural finishes may need regular cleaning and resealing.
Enhancing Your Deck with Accessories and Lighting
Accessories and lighting can take your deck design to the next level, adding functionality and style. Consider adding pergolas, railings, planters, and other accessories to enhance the usability and aesthetics of your deck.
Pergolas provide shade and create a cosy outdoor living space. They can be customised with decorative elements such as lattice panels, curtains, or climbing plants for added privacy and beauty.
Railings are essential for safety and can also add visual interest to your deck. Choose from a variety of materials, such as wood, composite, or metal, and select a style that complements your deck design.
Planters can be used to bring greenery and colour to your deck. Consider planting flowers, herbs, or even small trees to create a lush and inviting atmosphere.
Lighting fixtures are a crucial element in deck design, allowing you to extend the usability of your outdoor space into the evening. Consider installing deck post lights, stair lights, or string lights to create ambience and ensure safety.
When selecting accessories and lighting, consider the size of your deck and the specific needs of your outdoor space. Smaller decks may benefit from space-saving accessories, while larger decks can accommodate more elaborate designs.
Maximising Space with Multilevel Decks or Platforms
If you have a small yard or uneven terrain, maximising space can be a challenge. Multilevel decks or platforms offer a solution by creating distinct areas for dining, lounging, or entertaining.
Multilevel decks allow for seamless transitions between different sections of your outdoor space. By incorporating steps or ramps, you can create separate levels that serve different purposes. For example, one level can be designated for dining, while another can be a lounge area with comfortable seating.
Platforms are another option for creating distinct areas on your deck. They can be built at different heights, offering a tiered effect and maximising usable space. Platforms can be used for a variety of purposes, such as a dedicated cooking area, a hot tub installation, or a space for outdoor games.
When designing multilevel decks or platforms, safety is of utmost importance. Ensure that stairs and handrails are properly installed and meet building codes. Consider the slope of your yard and any potential obstacles when planning the layout.
Maintaining Your Deck's Beauty Over Time
Regular maintenance is essential to ensure that your deck remains beautiful and functional for years to come. Here are some tips to help you keep your deck in top shape:
Regularly clean your deck to remove dirt, debris, and stains. Use a mild cleanser and a soft brush or pressure washer to avoid damaging the surface.
Prevent mould, mildew, and stains by keeping your deck dry and well-ventilated. Trim overhanging trees or bushes to allow sunlight to reach the surface.
Protect your deck from harsh weather conditions by applying a waterproof sealant or stain. This will help prevent moisture damage and prolong the lifespan of your deck.
Inspect your deck regularly for any signs of wear or damage. Replace any loose or damaged boards, and tighten any loose screws or nails.
Consider applying a UV protectant to prevent fading and discolouration caused by sun exposure.
By following these maintenance practices, you can ensure that your deck remains beautiful and structurally sound for years to come.
Conclusion
A well-designed deck can transform your outdoor space into a haven of relaxation and entertainment. By carefully selecting the right materials, incorporating patterns and colours, and adding accessories and lighting, you can create a decking Adelaide that reflects your personal style and enhances the beauty of your home.
Remember to prioritise regular maintenance to protect your investment and ensure the longevity of your deck.
So, unleash your creativity and start designing the deck of your dreams.
Source: Decking Design Tips for Home Improvements That Wow
0 notes
Text
Elevate Your Outdoor Living: A Guide to Building a Stunning Deck
Whether you envision a cozy retreat for morning coffee or a sprawling platform for hosting gatherings, constructing a deck offers a myriad of possibilities. Let's explore the key steps to build a deck a stunning deck that seamlessly integrates with your lifestyle.
1. Plan and Design:
The foundation of any successful deck project lies in meticulous planning and thoughtful design. Consider the purpose of your deck, its intended use, and the layout that best complements your outdoor space. Factor in elements like sun exposure, views, and accessibility to create a design that enhances both functionality and aesthetics.
2. Choose Quality Materials:
Selecting the right materials is crucial for the longevity and visual appeal of your deck. Opt for high-quality, weather-resistant materials such as pressure-treated lumber, cedar, or composite decking. The choice of railing, posts, and stairs also contributes to the overall look, so explore options that align with your design preferences and maintenance preferences.
3. Obtain Necessary Permits:
Before breaking ground, check with your local municipality to determine if permits are required for your deck construction. Compliance with local building codes ensures the safety and structural integrity of your deck. Obtain the necessary permits and approvals to proceed with confidence in your project.
4. Prepare the Site:
Clear the designated area of debris, vegetation, and obstacles. Ensure that the ground is level and well-compacted. Consider using landscaping fabric to prevent weed growth under the deck. Adequate site preparation is fundamental to the stability and durability of your deck.
5. Construct the Frame: Building a sturdy frame is the backbone of your deck. Follow the design plans, and use pressure-treated lumber for the frame. Pay careful attention to proper joist spacing and alignment, ensuring a solid foundation that can withstand the elements and support the decking material.
6. Install Decking Material:
With the frame in place, it's time to install the decking material. Whether you choose traditional wood planks or low-maintenance composite decking, ensure consistent spacing between boards for both aesthetic appeal and proper water drainage. Consider patterns like herringbone or diagonal layouts for added visual interest.
7. Add Railings and Finishing Touches: Enhance the safety and style of your deck by adding railings. Choose from a variety of materials and designs that complement your overall vision. Consider incorporating built-in seating, planter boxes, or lighting to add functional and aesthetic elements to your deck space.
8. Regular Maintenance: Preserve the beauty and integrity of your deck by implementing a regular maintenance routine. Depending on the material used, this may include periodic cleaning, sealing, or staining. Regular inspections will help identify any issues early on, allowing for timely repairs and an extended lifespan for your deck.
9. Create a Cozy Atmosphere:
Furnish your deck with comfortable outdoor furniture, weather-resistant cushions, and accessories that reflect your personal style. Incorporate elements like an outdoor rug, potted plants, or string lights to create a cozy and inviting atmosphere for relaxation and entertainment.
0 notes
Text
Beyond Timber: Unveiling the Modern Edge of Hardwood Decking
For centuries, hardwood decking has held a coveted place in outdoor spaces, its timeless beauty and enduring strength whispering tales of sophistication and longevity. But in the ever-evolving world of design, what once embodied tradition now finds itself embracing a surprising twist: a shift towards the modern edge.
Step away from the rustic cabin aesthetic and delve into the unexpected possibilities of Hardwood Decking reinvented. Sleek lines, minimalist profiles, and unexpected pairings with contemporary materials are reshaping the landscape of what this natural wonder can achieve. Picture sleek Ipe boards seamlessly integrated with glass railings, creating an illusion of floating tranquility amidst your urban oasis. Or envision the fiery hues of Tigerwood playing counterpoint to the stark beauty of a concrete fire pit, forging a dramatic yet harmonious focal point.
The key lies in breaking free from convention. Hardwood decking isn't confined to traditional tongue-and-groove installations. Consider the allure of hidden fastening systems, where boards appear to magically levitate, leaving clean lines and an air of understated elegance. Embrace geometric patterns, weaving Ipe and Garapa in a captivating checkerboard, or experiment with diagonal layouts that add dynamism to your outdoor space.
The modern edge of hardwood decking extends beyond aesthetics. Sustainability joins the conversation, with homeowners actively seeking responsibly sourced, FSC-certified woods like Cumaru and Siberian Larch. These choices not only enhance the eco-conscious appeal of your deck but also tell a story of environmental responsibility, aligning your outdoor haven with your values.
Technology, too, takes center stage. Integrated lighting systems embedded within the hardwood decking boards transform your space into a mesmerizing after-dark haven. Imagine warm LED strips illuminating the rich grains of Ipe, creating a captivating pathway that guides you under starlit skies. Or picture recessed speakers hidden within the decking, sending your favorite tunes floating across your outdoor paradise.
But the allure of the modern edge never loses sight of the inherent magic of hardwood decking. The natural warmth of the wood, the earthy aroma that mingles with the breeze, and the comforting texture beneath your feet are timeless elements that elevate any design. It's about striking a balance between innovation and tradition, embracing the future while cherishing the essence of what makes hardwood decking truly special.
So, shed the limitations of the expected. Embrace the modern edge of hardwood decking and embark on a journey of creative expression. Let your outdoor space become a canvas for your vision, where nature's timeless elegance dances with contemporary flair, crafting a sanctuary that reflects your unique spirit and sets the stage for endless possibilities. The world awaits, and hardwood decking is your brush to paint it in your own style.
0 notes
Text
Top 10 Decking Tips For A Stunning Outdoor Space
Creating a beautiful outdoor space that seamlessly blends aesthetics and functionality is a goal for many homeowners. One of the key elements that can elevate your outdoor area is decking in Melbourne wide. A well-designed deck not only adds value to your property but also becomes a focal point for gatherings and relaxation.
To help you achieve a stunning outdoor space, here are the top 10 decking tips you need to consider:
Choosing the Right Decking Material
The foundation of a successful deck lies in selecting the right decking material. Whether it's natural wood, composite, or PVC, each material comes with its own set of advantages and disadvantages. Consider factors like durability, maintenance, and appearance to make the best choice for your space.
Planning for Optimal Layout and Size
Before diving into construction, meticulously plan the layout and size of your deck. Ensure it complements your outdoor area's dimensions and allows for comfortable movement and seating. A well-proportioned deck enhances the overall appeal of your space.
Incorporating Creative Decking Patterns
Take your decking game up a notch by considering unique, decks in Melbourne patterns. From herringbone to diagonal layouts, these patterns can add visual interest and character to your deck, making it stand out as a stylish feature.
Prioritising Sturdy Deck Foundations
A solid foundation is essential for the longevity of your deck. Properly constructed footings and supports provide stability, especially in regions with varying weather conditions. Don't cut corners when it comes to the structural integrity of your deck.
Regular Deck Maintenance
To keep your decking in Melbourne top-notch condition, establish a regular deck maintenance routine. This involves cleaning, staining, and sealing to protect the material from harsh elements and maintain its appearance.
Integrating Deck Lighting
Extend the usability of your, decks in Melbourne into the evening hours by incorporating deck lighting. From subtle recessed lights to elegant string lights, proper lighting creates a cosy ambience and enhances safety.
Adding Functional Outdoor Furniture
The purpose of your deck goes beyond aesthetics; it's a place to relax, entertain, and dine. Select outdoor furniture that complements your decking style while being comfortable and functional for your intended activities.
Greening Up with Deck Landscaping
Integrate greenery and landscaping elements around your deck to create a seamless transition between the deck and the surrounding yard. Potted plants, flower beds, and climbing vines can soften the edges and enhance the natural beauty.
Customising with Deck Accessories
Elevate your deck's visual appeal with carefully chosen deck accessories. Railing designs, planter boxes, and pergolas can add architectural interest and provide opportunities for personalisation.
Seeking Professional Decking Advice
While DIY projects are rewarding, seeking professional advice can save you from potential pitfalls. A decking expert can guide you through material selection, design considerations, and construction techniques to ensure a successful project.
Conclusion
In conclusion, creating a stunning outdoor space with Deck Builder in Melbourne involves a thoughtful blend of design, functionality, and maintenance. By choosing the right materials, planning meticulously, incorporating creative elements, and maintaining your deck regularly, you can transform your outdoor area into a captivating retreat that you'll enjoy for years to come.
Remember, your deck isn't just a structure; it's a canvas for your creativity and a reflection of your personal style. So, embark on your decking journey with enthusiasm, and watch as your outdoor space is transformed into a truly stunning haven.
0 notes
Photo

Deck - Contemporary Deck
#Example of a large trendy backyard deck design with no cover contemporary home layout#medium wood siding#medium wood decking#contemporary home design#natural stone paver walkway#diagonal home roof
1 note
·
View note
Photo


The Classic 70-foot ‘Gentleman’s Yacht’ The Spirit P70
The Spirit P70 looks like a boat from the 1930s, but its list of modern technologies includes lithium batteries to power the house systems.
Spirit Yachts’ flagship P70 may look like an extra from The Great Gatsby, but this oh-so-elegant wooden motoryacht, with its gleaming mirror-varnished mahogany and classic flag-blue paint, is new from the keel up.
The 71-footer was built by Britain’s Spirit Yachts for an experienced Norwegian owner who fell in love with the timeless lines of the company’s classic wooden sailboats, but wanted the style to translate to a powered yacht.
If the Spirit name sounds familiar, this was the builder that has enthusiastically supplied yachts for Daniel “007” Craig to sail in those epic James Bond romps Casino Royale, and the newest, No Time to Die.
But according to Sean McMillan, Spirit Yachts founder and chief designer, the owner didn’t simply want a classic-looking cruiser with a retro Roaring Twenties vibe that would sit at a marina. He wanted a boat that could go places. “The brief was to build a motoryacht capable of cruising from Britain’s south coast, across the North Sea to the Baltic and on to Norway, at an average speed of 18 knots. And he wanted the boat to go there and back—that’s over 1,000 miles—without having to refuel,” McMillan told Robb Report.
To meet the challenge, McMillan and a dedicated team of eight woodworking craftsmen, turned to the same wooden boatbuilding techniques they use to craft Spirit’s range of classic sailboats, including the recently launched 111-foot masterpiece Geist. That involved creating a framework using tough sapele hardwood. To this, longitudinal strips of Douglas fir were screwed and bonded to build the hull shape. Then, on top of this, multiple layers of Japanese kaya wood were glued diagonally to deliver carbon-fiber levels of strength and rigidity.
“It creates a hull that is immensely strong and light. The P70 weighs just 24 tonnes, which is almost half the weight of similar-sized fiberglass counterparts,” explains McMillan.
Lighter weight also allowed smaller than usual engines to be mounted in the P70’s over-sized engine room. The twin 800-hp six-cylinder MAN turbo diesels are capable of delivering a top speed of 29 mph, with cruising at a more relaxed 20 mph.
Without doubt, it’s the lines of this timelessly elegant 1930s-style “gentleman’s” motoryacht that sets it apart. But the process of creating such a head-turning profile wasn’t easy. The owner, a highly experienced and knowledgeable boater, had firm ideas on what he wanted. It resulted in McMillan modifying the design more than a dozen times.
“He really liked the style of some of the Spirit power boats I’ve designed over the years. So, we combined the flared bow and tumblehome stern from our Spirit P40 with the 1930s style of our sailing yachts, and applied it to a larger motoryacht design,” he explains.
The result is nothing less than a piece of floating art, with a classic slender waist—the beam spans just 16.5 feet—and that tall, proud bow. And there are some lovely classic design features, like the stainless-steel engine vents on the cabin sides that were inspired by those from a classic ‘50s Mercedes-Benz 300SL.
“To keep the sleek, uncluttered look, we did away with the typical stainless handrails, and lowered the level of the deck to make it safe and easy to walk around the yacht,” says McMillan.
Below decks, the slightly unconventional layout requested by the owner includes a central wheelhouse, a rich, leather-lined salon area forward, and a spacious galley and dining area aft. And on the lower levels, the master suite is in the bow with twin guest cabins at the stern.
The quality and attention to detail are exceptional. You can understand why it took a team of three painters almost seven months to varnish the bare-wood interior. From start to finish, building the yacht at Spirit’s yard in Ipswich, on Britain’s east coast, took almost three years.
But while the P70 looks classic and elegant in its design, beneath the skin it’s packed with some of the latest maritime technology. That includes a bank of lithium-ion batteries that can power the yacht’s air conditioning and zero-speed stabilizers while at anchor overnight, without cranking-up the generator.
“Wooden motoryachts like this are the future,” says McMillan. “They’re light, sustainable, have a great strength-to-weight ratio, are highly fuel-efficient, and, as our P70 shows, can be turned into things of real beauty.
The price of a new P70 starts at £4 million, or roughly $5.5 million.
By Howard Walker.
#The Classic 70-foot ‘Gentleman’s Yacht’ The Spirit P70#boat#ship#yacht#yachtlover#luxury#luxury yacht#luxury living#luxury life#luxury lifestyle#billionaire#billionaire lifestyle#rich#the good life
58 notes
·
View notes
Text
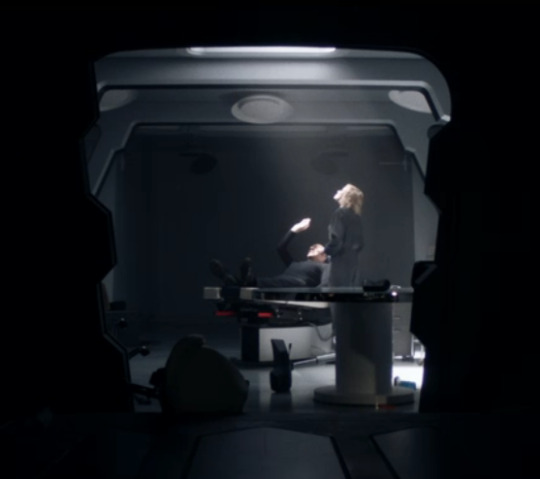
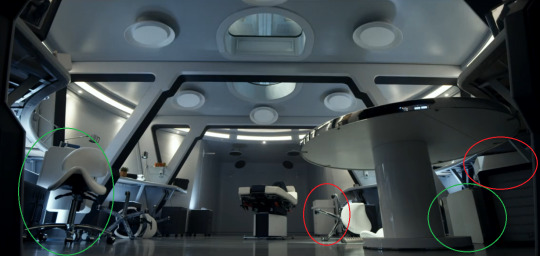
Sickbay Deep Dive Pt. 2
After we explored the general layout of sickbay in part one of this Deep Dive, it is now time to have a look at all of the stuff filling this part of the ship. While it might not seem all that much at first, there is actually a lot to see and talk about, and as I was working on this post, it got a little out of hand. So, in order not to crash tumblr with too many pictures, I have decided to split this Deep Dive into three parts, instead of two.
Today, I am going to take you on a little tour of all the furniture in La Sirena’s sickbay.

Before we begin, a quick note on Part 1: The first part of this discussion focused on the size and general floor plan of sickbay. Since then, as you might have read, we got a bit of a look behind the scenes which included a set layout presumably created by the production crew. It mostly confirmed my suspicions so far, but I’ll have to adjust some of my assumptions regarding the size of sickbay, at least a little. Once I’ve had time to play around with that a bit, I’ll post an update to part 1.
2) Furnishing Sickbay
One of the things I love about La Sirena is how modular everything on board seems to be. From the transporter control stand that is never in the same place twice, to the number of chairs on the bridge that adapt to the ship’s current occupancy level, to the fluctuation in the various cargo containers all around the two decks, anything that isn’t bolted to the floor will get moved around at some point. This is particularly true for sickbay, where everything but the counter and lamps gets shuffled around near-constantly. Which makes sense, since every piece of furniture except for the table is actually on caster wheels - and I’m not excluding the possibility the table has wheels hidden in its base as well. So, let’s go down the list of furniture and see what we can find out about each piece
The Biobed
Probably of central importance for a functioning sickbay is a good biobed. The one on La Sirena is usually placed in the alcove at the back of the room, but it can be freely moved around as needs require


Note that in episode 5, when Bruce Maddox is being treated, the bed is facing the back of the alcove, whereas in episode 7 and 8, it’s facing towards the front of the room. After the crash on Coppelis, the table is pushed back close to the door, and the biobed is placed in the middle of the round part of the room, directly under the overhead windows.
Like practically everything on La Sirena, the biobed has holographic controls. It includes a scanner (can be seen running over Maddox when he wakes up in sickbay) as well as many life-sustaining functions.

A read-out of the patient’s vital signs and sensor data can be projected onto the wall of the alcove, though we only see this when Maddox is being treated in episode 5.

We only get one shot of the bed without an occupant, namely when Sirena comes back to life after crashing on Coppelius. You can see some of the mechanics that very likely serve to adjust the angle of various parts of the cot, like the footrest, back, and headrest, which is articulated and seems to be adjustable independent of the rest of the back.
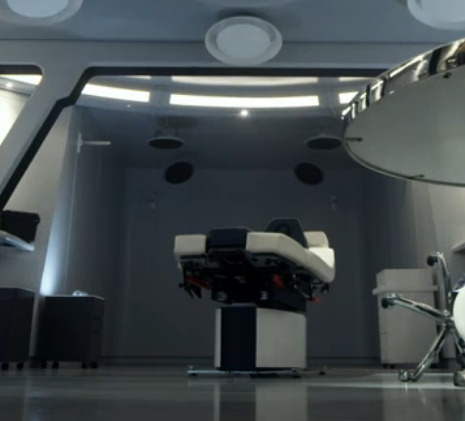
In this still, you can also see that the biobed, just like everything else, appears to be on wheels.
Table & Seating
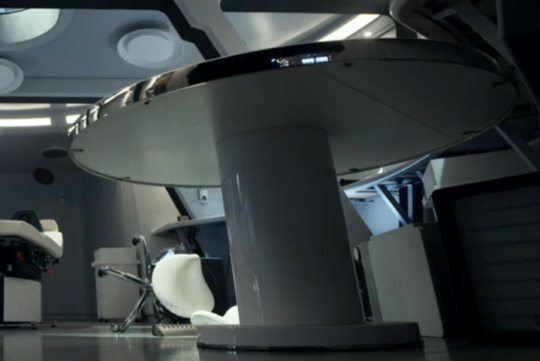
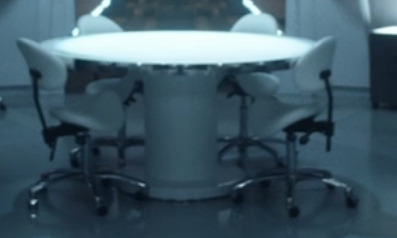
The second most prominent piece of furniture is the round table that’s usually at the centre of the circular lab area.
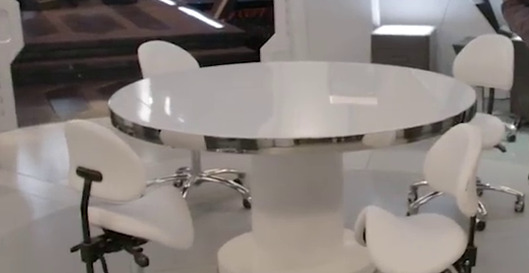
Not much to say here. It looks to be maybe 1.5m in diameter with a single round foot at the centre. The surface is smooth enough to be reflective and there’s a metal band running around the circumference.
Around the table are four white chairs (on wheels) that have a very ergonomic saddle-like shape.
We don’t actually ever see anyone sitting on them, because people tend to prefer the stools, of which there are four spread around the room (the second pic is from when one of them ends up in the mess hall after the Coppelius crash). They’re on wheels as well and have a bit of lumbar support.
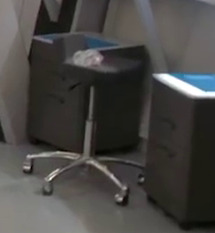
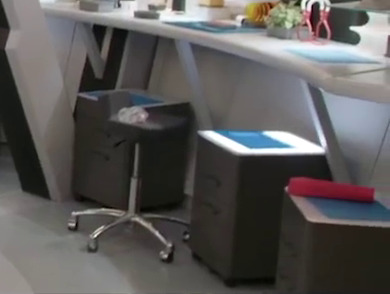
Storage
All of the storage in sickbay seems to consist of chests of drawers on caster wheels. I have no idea if there is an English term for these, please help me out in replies if you have any insight, but I’m talking about what in Germany would be called a Rollcontainer. Basically this thing:
Now if you’re wondering why I have chosen this particular example (which, in case you couldn’t tell from the website design and name, is an IKEA product), let me give you a quick hint:
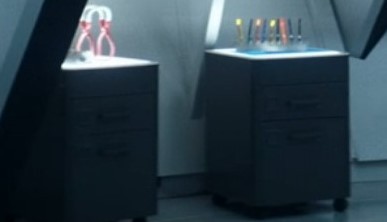
Somebody has been at a flat-pack furniture store of interstellar renown!
Actually, as has been pointed out by a lot of people, there are IKEA products spread throughout Picard, especially lamps (which have been found on Coppelius, on Freecloud, and even on a Romulan-infested former Borg Cube). As far as I can tell, though, the grey drawers are the only IKEA products in sickbay.
Because everything in sickbay moves around constantly, it’s a little difficult to know for sure how many of these chests there are, but my best guess at the moment is twelve.
As you can tell from the pictures above, the chests were upgraded with light fixtures, added inside the upper rim, and they’re topped with white covers. I think you get a glimpse of the light strips when the top falls off one of the chests in the Coppelius crash:

(Top view of one of the chests. I’m assuming those are rows of LED’s that are turned off in this particular example. NB: The fact that it doesn’t look rectangular is because this image is cropped from the very edge of a frame with a ton of lens distortion. You can tell it’s straight in the original image)
There are blue and black mats on some of the chests, as you can see in these two images:

There are two other types of chests of drawers that, as far as I can tell, were sourced somewhere other than IKEA. They’re both white; one of them is very similar to the grey ones except with a rail around it...


... and the other one has two drawers on an articulated foot (on wheels).
There are two of each of these. We only get a very blurry glimpses of them all together, but the count after the Coppelius crash confirms that it’s two each.

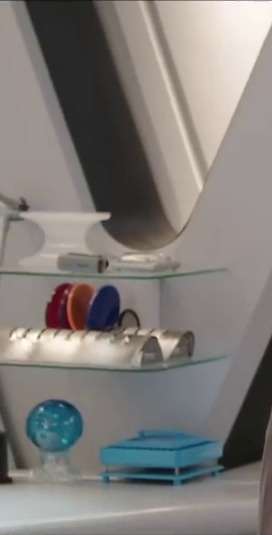
Counter Furnishings
There are two more bits of set design that I would class as furniture, rather than general... stuff, so I’m quickly going to list them here.
There are very small glass shelves over the counter, fastened to the diagonal support beams at the front and back of the room.
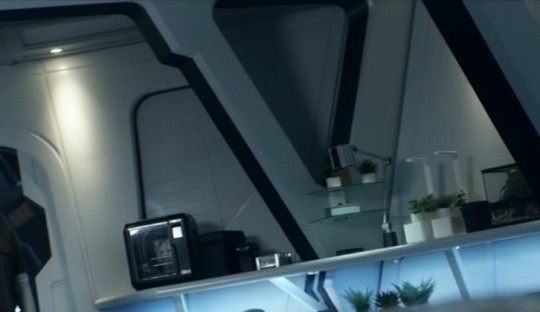
And then there are four metal desk lamps on each side of the counter, to make absolutely sure every inch of the workbench can be lit properly. They each have a handle at the front of the cylindrical heads, so they are easier to move
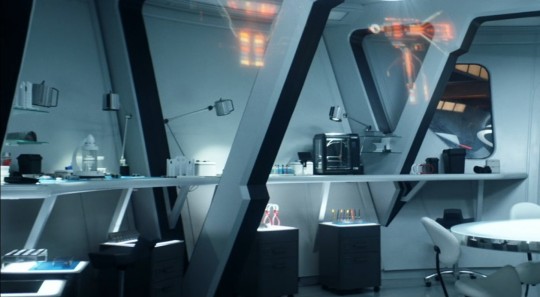
(It’s a little difficult to see in this picture, but the top of the lamp at the very left of the frame, just above the shelves, has the handle prominently visible, and you can also see it on the second lamp from the right.)
And that concludes the furniture section of this Deep Dive.
Next time on “very infrequent but very long posts about our favourite Kaplan F17 Speed Freighter with you host, Lili”: A collection of mostly mysterious stuff scattered across every surface of sickbay, and an exploration of continuity errors, my own personal fan theories, and other miscellanea.
#star trek picard#la sirena#emil (emh)#deep dive#lower deck#sickbay#ikea#long post#i'm gonna have to go through these one day and redo the tagging#but for now i'm just gonna revel in the fact i get to post this#and i managed to procrastinate talking about all of the STUFF which is the main reason this has taken so long#too much stuff#(but who are we kidding - any day where i get to stare at sickbay pictures is a good day)
34 notes
·
View notes
Text
extract from Octokittens (And some theories on how they might have come about). or well, the best of the four short stories in completion really. rating T, mild horror, a little animal death (brief, not a long-term pet death). mechs typical violence.
The ship was a wreck. It was clear on the maps that that was the case, and it was why Hans and Albrecht were visiting it, they were scrap dealers after all. They’d fallen on hard times, and they’d heard that there was a valuable cargo on board, valuable enough to set themselves up for several lifetimes of luxury.
Neither of them thought to wonder exactly what had destroyed the ship in the first place. Nor why no one had successfully claimed the wreck for themselves in the time since the ship had been destroyed. It had been a long time since then, long enough no one could really remember exactly how long.
Anyway, they had set out from New Venus in their little trawler and after a couple of weeks, their target had crested over the bottom of their screens, vast and red and crumbling. A small cluster of other trawlers hovered at its side, each of them battered and solar-worn, but not quite as much as the ginormous ship they clung to like limpets. None of them looked particularly recent either, so Hans shrugged and steered their own ship in closer. They weren’t competition, and they’d serve a handy bonus if there was any hold space left on the way back. Hans thought he recognised a couple of builds that were currently in vogue due to having crossed into the vintage territory, and that always pushed the prices up for already expensive spare parts.
The boosters flipped to reverse, and the Jaunty Clipper came to a shuddering halt. Hans slowly shut the systems off and went to join his brother in the cargo hold. Albrecht was already suited up and checking his oxygen tank, so Hans chucked his own spacesuit on over his clothes before picking up one of the large maglev torches. Sealing his helmet, he flicked the switch to start the process of opening the cargo bay door. The fans whined, sucking the air out of the room until they just went silent, even as the blades still turned. Only when the blades stopped did the door judder upwards, metal folding in on itself, impossibly quiet, revealing the gaping hole in the wreck they had pulled up next to.
It alone dwarfed the Jaunty Clipper, yet it was tiny in comparison to the hull of the wreck it was set into. Flashing his light about, the beam disappearing into the dark, just barely catching a few beams and supports in the faint light, Hans wondered if this was what a flea felt like, trying to comprehend the extremity of its host.
“Ready?” Albrecht’s voice crackled over their intercom and Hans was about to reply in the affirmative when he noticed something floating in the space between them and the wreck. It was pink, and clearly not space debris or a broken bit of ship, though it was too far away to tell what it was exactly.
“Give me a second,” Hans answered, shooting a grappler chain out to retrieve the item. It came shooting back in with no inertia behind it, and Hans was surprised to have a small child’s doll drop into his hand. The fabric was a bit worn and faded and ratty, but he could still see a thin line of stitches picking out a smile, and two black buttons for eyes and some red wool for hair. He smiled and wondered who it had belonged to and if it’d make a nice present for his friend’s daughter. Carin always liked souvenirs of his trips.
Albrecht jumped past him, throwing himself out into the hole. “Come on, we don’t have time for kids toys. The oxygen tanks won't last all day, we need to get a move on.”
Hans rolled his eyes but never the less let go of the doll, watching it float away and followed his brother into the wreck.
He landed in a tall, narrow corridor with handholds spaced out evenly down the walls and ceiling. Albrecht was clung to one of them, fiddling with a gyroscope. “Let's try for the centre? Cargo bay should be somewhere near there,” said Albrecht.
Hans nodded and pushed off down the corridor. It was long and labyrinthine, with the occasional junction, and at each Albrecht checked the gyroscope before leading them down it or not. There weren’t any signs anywhere, at least not any that had survived the test of time. Hans noticed the occasional stripe of white paint against the major green in the few places where it hadn’t been consumed by bubbling rust, a single chipped or faded letter or stripe holding out by itself. He didn’t recognise the alphabet though, all harsh lines and corners. Here almost half a dozen letters survived, scattered across three lines, at least that was what Hans assumed, he wasn’t sure exactly what direction the text was supposed to be read in. Most of the letters were some form of an upright stick with a horizontal or diagonal branch off, but there was one that almost looked like an ‘R’ in Standard, with the stem removed. Another looked like a more jagged ‘s’ or ‘5’. He knew it had to mean something – and on a ship like this, it was probably some sort of area designation. If only he could read it. If only it wasn’t so damaged.
Slowly, he ran a gloved finger across the text, knocking chips of paint loose. They flocked around his hand, suspended in the ether and dancing slowly in the light of his torchlight.
Shaking his head, he pushed off after Albrecht again, who he’d let get ahead of him as he tried to puzzle out the script. His brother had already disappeared around a sequence of corners, and Han’s stomach rolled as he passed off shooting corridors, still with no sign of Albrecht. He was sure his brother wouldn’t leave the corridor they were on without warning him. He was sure.
Oh, how he wished there was a map of this place. That would make things so much easier.
There was a sharp popping noise from around the bend.
Hans floated onwards, his torch catching on a sheet of greying paper behind a panel of glass on the wall opposite him. There was a drawing on it. A drawing of the ship. Six silhouettes of the hull, with a layout of its snaking corridors set out inside each, and on one a small red circle with the words ‘you are here’ written in Standard above it. Apparently he was on Level Three, in Quadrant Two, Sector Six. It was a residential area, and directly above him, two floors up was the nav-deck, while the cargo bays were a floor down and maybe two corridors away.
That was useful to know. Hans batted away another one of those dolls and continued onwards.
Two more corners and he found his brother pounding on a closed door, fists silently clattering into the metal and nudging Albrecht away down into the corridor until he bounced back against the door to hit it again. Hans slid into place next to him as Albrecht stopped and rested against the metal.
“Bloody thing is sealed up tight,” Albrecht said over the comms, kicking at a pair of dolls floating around his feet. “Got the plasma cutter?”
Hans nodded and flicked the switch to begin charging it. “At least the cargo bay’s close. Should be a ladder down on the other side of this.”
Albrecht turned and squinted at him. “How’d you know that?”
“There was a map?”
“I didn’t see one.”
“It was just back there,” Hans said, gesturing vaguely back the way he’d come. “You must have just missed it.”
“I’m not sure I did, I was keeping an eye out for one. It-” Albrecht started to disagree, but the plasma cutter in Hans’ hands burst into life, bright, glowing purple energy spitting into a narrow cutting beam. Albrecht carefully pushed away from the door to let Hans centre himself.
“Whatever. Get this open, Hans.”
The plasma made short work of the metal, Hans quickly inscribing a deep rectangle into the door, shaping the edges of a panel he’d remove to create their entranceway. Clicking the cutter off, he braced himself against the roof of the corridor, and lashed out with his foot, expecting the metal to buckle and the panel to fall in.
The metal shifted under his foot but didn’t budge. There was something behind it. Blocking it.
“A hand?” Hans asked. “The crowbar?”
Albrecht drifted forwards, planting himself in place and stabbing the sharp end of the crowbar through the weakened metal. Then, with Hans’s help, levered the metal up, opening their entranceway.
From out of the black a dozen of the dolls came spiralling. The brothers looked at each other, and Hans drove his hand through the hole. He felt the dense resistance of what must be hundreds of the things, piled up and packed into the corridor. No matter how far he reached, there seemed to be no end to the things.
He pulled his hand out, shaking his head. “No way through.”
Albrecht pointed silently to his hand, the one that Hans had just pulled out of the pile of dolls. Hans looked down.
There was a thin scrap of red fabric twined around his fingers. That wasn’t a surprise, he’d clutched at a lot of the things as he searched for an end to the dolls.
The scattering of white across his palms though. Those were teeth, and they looked humanoid. Half a dozen of them, child-sized and a handful of stumpy cream cylinders that were possibly finger bones.
Hans snatched his hand away, watching them float slowly down the corridor.
Silence for an eternal moment, as the brothers stared each other down.
Albrecht blinked first. “Did your map give an alternate route?”
Hans nodded. There were a couple of corridors they could take, but it would be a complicated route to traverse with many junctions to traverse. He didn’t fancy getting lost. On the other hand, they’d just passed a stairway that would lead them up to the nav-deck and captain’s area. He explained this to Albrecht who sighed and nodded.
“We were going to look for the logs anyway. Lead on then.”
Albrecht followed as Hans showed him back towards their entrance point. He frowned as Hans pointed out the map, but didn’t argue, and together they located the service ladder that would take them up to the control decks. It was simple to follow the ladders up, only pausing to open hatches between the levels. The first time, Hans found the metal hatch shut and unmovable, and he panicked and feared it had been bolted shut, or worse was being held down by more of the dolls. It was a false alarm though, as no more had Hans than wished that the hatch was clear and open, then there was a pop and the thing burst open. Some tenacious rust giving away he decided as he floated through. Must have been.
They made it onto the control deck though. It was a vast thing, more empty space than panels and terminals, all dark red and grey. Hans didn’t spend much time looking at the regular contents of the room though, there were far more interesting things to consider. Like the giant pile of gold and gems spilling over one of the desks and burying the skeleton slumped in the seat. Or the massive dinosaur skeleton that was scattered across the floor. And of course, more of those dolls, hovering aimlessly in the ether.
His brother tapped him on the shoulder, and he turned around to look at the wall behind them. There was a cosmonaut’s suit resting at its base, the helmet glass cracked and distorting the image of the empty-eyed skull within. Above it…
Hans didn’t know many languages, but he could guess that each message read the same as the one he could. Two words, blood red and edged with scratches.
Don’t Wish.
“Wish I knew what that meant,” It took a moment to recognise his wording, his glove slapping over his visor above his mouth. “I didn’t mean it.”
Albrecht gave him a weary look as there was a pop and a red leather-bound book appeared between them. Hans jumped backwards, clattering against the wall as Albrecht went spinning into one the terminals clutching it viciously. Both of them stared down the book.
Hans broke the stalemate, activating his coms with a hiss of static. “I did the doll room. This is your turn.”
He could imagine Albrecht’s sigh as his brother hesitantly floated over to the book. When it did nothing after a gentle prodding, he cautiously picked it up and started thumbing through it with bulky gloved hands. Hans waited as Albrecht skimmed through it with a look of deep concentration.
Eventually he looked up again, understanding in his eyes. “It says the ship stumbled into an area of latent potential creation so that anything they wished for would manifest. Most of them couldn’t control their desires and were destroyed by their greed.
“We could use this. We could get rich on this. This is it, Hans! Anything we can think of, ours!”
“Anything?” Hans asked quietly.
Albrecht’s eyes flashed as his hands filled with nuggets of dark gold and the glistening white of flawlessly cut diamonds. They spilt out between his fingers, floating into the room. His brother grinned. “Anything. Just be certain about what you’re after. Don’t get distracted. That’s what happened to them.”
Hans nodded, absentmindedly catching one of the gems his brother had created in his hand. It really was perfect, no sign of any defects and, being as long his thumb and almost as wide, worth a small fortune on any planet. With a small bag of those, they’d be rolling in credits, even after paying off their debts.
Across the room, Albrecht was still creating whatever crossed his mind – rare books, wines, silks – and Hans watched as his brother's imagination crafted them a small fortune. He wasn’t looking forward to carting it all back to the ship, but he also supposed he should probably try out a couple of wishes himself. It was just a case of what to wish for. Albrecht seemed to have all the money-making things covered, and he didn’t want anything too bulky or hard to manoeuvre through the ship.
Would it be possible to create something alive Hans wondered? The Jaunty Clipper had had a vermin problem for a while, and it tended to get lonely out in space for months on end, with only his brother for company. He knew it didn’t need to be like that either, just the two of them – he remembered the days when they were kids, out on their mother’s tug as she rescued the scuppered ships. Those trips took weeks, and she was always busy, but there was always a warm bundle of fur to curl up with. They’d left the Sol system far behind them though, far enough that a proper Earth-cat had been out of the question for years. And none of the alien versions now available to them had ever really felt the same.
But now…
Hans fixed his mind on the idea of his new cat. Large and fluffy, like a Maine Coon. Dark grey fur, with golden eyes. A hunter, a cuddler.
And he wishes.
There was a pop, and the cat appeared.
And went limp.
He realised his mistake as Albrecht looked up, frustration flashing across his face. “You could wish for anything, and you wish for a cat. And you even forget there’s no atmosphere,” Albrecht sighed. “It’s a good thing I’ve got us both covered then. You can start getting this back to the ship for me then,” he gestured to the pile of goods he’d created. “It’s the least you could do.”
Hans stared his brother down as Albrecht ignored him and turned back to creating his gold. All he’d wanted was a companion. And he’d messed up and it’d died, and his brother hadn’t even cared. Screw his brother. Albrecht had never really cared for him, had always treated him like dead weight except for when he’s the packhorse. Screw him.
Hans decided that maybe he could still have his cat, only he was going to have one better adapted to space. He didn’t think too much about what that meant, but he knew that they’d be clever, and fast, and they’d survive. And he wishes they were real and he wishes his brother will regret spurning him.
A hundred eyes blink into existence.
His brother disappears under a pile of fur and tentacles.
The eyes look up at Hans, hunger unsatiated.
Hans starts running.
12 notes
·
View notes
Text
The Ten Best STEM Toys to Give as Gifts in 2020
https://sciencespies.com/nature/the-ten-best-stem-toys-to-give-as-gifts-in-2020/
The Ten Best STEM Toys to Give as Gifts in 2020

In recent years, STEM-themed toys for all ages have flooded the market, making it a little overwhelming for people to choose the most skill-based gifts for the kids in their lives. But a team of engineers has come to the rescue with a recommendation of the most thoughtfully designed STEM-oriented products on the market.
Each year, Purdue University’s INSPIRE Research Institute for Pre-College Engineering turns into a toy testing laboratory as faculty and students run mounds of toys, books and games through their paces. The highest rated products earn a coveted spot on the institute’s annual Engineering Gift Guide, which is now in its seventh year.
“Play is one of the places where we can capture a kid’s imagination,” says Tamara Moore, a professor of engineering education and the executive director of INSPIRE. “For a child to get interested in potentially having a STEM career, you want [to] capture their imagination. Being able to have that freedom to play is really one incredibly important way for this to happen.”
The gifts usually go through a strenuous review process, which includes input from parents and kids that test out the toys. But because of the Covid-19 pandemic, the process looked different this year. It was spearheaded by a team of four undergraduate students that thoroughly inspected, played with and reviewed nearly 100 toys released in the last couple of years, Moore says.
The team looked for toys that embodied the hallmarks of engineering and fostered meaningful skills, like spatial reasoning, computational thinking, innovation and creativity. “And those skills start early,” Moore says. Well-designed toys can expand young learners’ minds and foster these skills throughout childhood development.
For Smithsonian readers, Moore and her team selected their ten favorite STEM gifts for 2020 spanning three different age groups.
0-4 Years
Weights Balance Game
This game comes with a wooden balance beam and a variety of blocks in different colors and sizes. The goal is to add blocks to the opposite sides of the scale without tipping it. The set also comes with a variety of cards that show the various ways the blocks can be positioned, helping kids learn how to follow a basic blueprint. By repositioning the blocks on different parts of the board, kids can develop spatial reasoning skills in an engaging, intuitive way. (Janod, $27.99)

Sweet Cocoon Stacking Stones
The 20 light, colorful wooden stones in this set come in a of number of sizes and odd shapes. Children are able to freely play with the stacking stones and build a variety of structures, from a simple tower to a more complex bridge. Moore says that the “stones are a perfect introductory toy for young children to explore engineering thinking and design,” while also improving their spatial reasoning and building skills. (Janod, $29.99)

My First Rush Hour
My First Rush Hour is a one-player maze game in which a child is tasked with navigating a little red car through traffic. Pick a challenge card out of the 30-card deck and then arrange the cars and trucks on the board to match the card. Then, the player has to drive the car around the other vehicles on the board and escape from rush hour. This game encourages spatial reasoning and problem-solving skills while fostering perseverance. (ThinkFun, $23.99)
5-7 Years

Addy-matic and the Toasterrific
This picture book by Curtis Mark Williams stars Addy, who is not a morning person. To avoid waking up early to make breakfast, she hatches a plan to toast her bread without having to get out of bed. To do so, Addy designs her very own Rube Goldberg machine—a complicated series of steps that accomplish a simple task—with items from around her house. It’s a captivating and fun story that centers around a hallmark of engineering: identifying a problem and solving it creatively. “It expresses the entire engineering process in a way young children can understand and relate to,” Moore says. (CreateSpace Independent Publishing Platform, $9.99)

Gears! Gears! Gears! Robots in Motion
This 116-piece kit comes with gears, wheels, claws and axles for kids to build their own moving robots. The set comes with instructions to build three different robot models complete with working treads and spinning eyes, but kids can also get creative and build their own. Since this toy has lots of moving parts, they’ll have to figure out how to get the robot’s gears and wheels rotating, which introduces kids to basic physics concepts while improving their spatial reasoning skills. (Learning Resources, $39.99)

Design & Drill Space Circuits
Good circuit toys are hard to find, especially for young kids, but this one is a winner, Moore says. This kit comes with an instructional storybook that walks builders through assembling various circuits using a board, a battery pack, an electric screwdriver and other tools and explains the basics of electricity flow. By following the instructions and employing problem-solving skills, kids can complete 20 space-themed missions—from lighting up a rocket to throwing a party on the moon—outlined in the book. (Educational Insights, $49.99)
Ages 8+

(Potato Pirates)
Enter the Spudnet is a potato-themed board game that introduces kids to the world of cybersecurity and networking without even having them touch a computer. Players receive tasks that they must complete by moving their ships from warehouse to warehouse on the board while protecting their privacy and preventing opponents from attacking them. Cybersecurity is more important than ever, so it’s a socially relevant game, Moore says. It also builds skills in critical thinking, problem solving and design. Plus, it’s just good family fun. (Potato Pirates, $57)

Code Rocket
Code Rocket comes with a small, green microcontroller in the shape of a rocket that connects to a computer via a USB port. When users run the accompanying software, they’ll be coached through the basics of coding through fun tasks, like lighting up certain parts of the rocket, which start easy and get progressively more challenging as young coders develop their skills. Code Rocket uses C++, a common coding language in the engineering world, so it’s a great introductory tool, Moore says. (Let’s Start Coding, $44.99)

(WordStruct)
WordStruct is an engineer’s version of Scrabble. This word-building game comes with 100 letter tiles that players can arrange together to spell out words, but in a 3-D structure. The goal is for players to score the highest number of points by building the most complex crosswords they possibly can. Words can be arranged horizontally, vertically and diagonally, creating an extra level of complexity. This game promotes innovative thinking, spatial reasoning skills and perseverance as players are challenged to think both critically and creatively. (WordStruct, $24.99)
Best Overall STEM Toy
youtube
Gravitrax takes the beloved marble run to a new level. It comes with more than 150 pieces that include obstacles like trampolines, bridges, tiles and ziplines, allowing players to build elaborate routes for their marbles to roll down. Kids have the option to follow the layouts that come with the game or design their own. Players will engage spatial reasoning, trouble-shooting, and critical and creative thinking skills in a game that’s fun for adults too. Plus, Moore says this game encompasses several of the engineering skills that she looks for in a good toy, in that “it allows children to explore both through creating their own designs and following maps that have been made [to follow].” (Ravensburger, $129.99)
Having trouble seeing our list of STEM toys? Turn off your ad blocker and you’ll be all set.
By buying a product through these links, Smithsonian magazine may earn a commission. 100 percent of our proceeds go to supporting the Smithsonian Institution.
#Nature
5 notes
·
View notes